Hello everyone!
Today I want to share with you a vintage card and a small step-by-step tutorial showing how I did it.

So, let's start with the tutorial.
At first I prepared my card base.

I wanted to achieve such a composition:

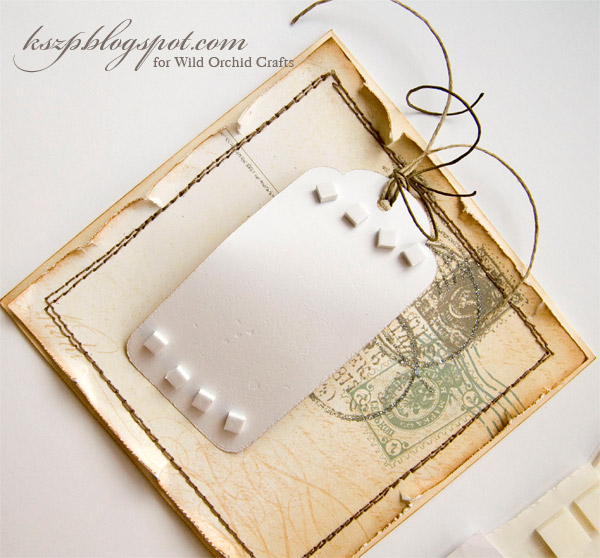
I adhered the first tag with small 3mm 3D foam squares.


Then I adhered the middle layer using big 3mm 3D foam squares.

And I attached the top tag.

Then I started adding flowers. I began from hydrangea blooms (I used 35mm and 50mm earth tone hydrangeas).

Next I added 2 dark red wild roses (on the bottom) and one 25mm ivory open rose (on the top).

Then I attached 20 mm pink and peach open roses...

... and some 15 mm pink and peach open roses.

I added hip rosebuds to bouquets...

... and some leaves.

After attaching bows made of twine and vintage seam binding ribbon...

... and painting slightly all flowers with white acrylic paint, the card was ready.

Thank you for stopping by :)
Have a nice day!
Klaudia
I used:Today I want to share with you a vintage card and a small step-by-step tutorial showing how I did it.

So, let's start with the tutorial.
At first I prepared my card base.

I wanted to achieve such a composition:

I adhered the first tag with small 3mm 3D foam squares.

Then I adhered the middle layer using big 3mm 3D foam squares.

And I attached the top tag.

Then I started adding flowers. I began from hydrangea blooms (I used 35mm and 50mm earth tone hydrangeas).

Next I added 2 dark red wild roses (on the bottom) and one 25mm ivory open rose (on the top).

Then I attached 20 mm pink and peach open roses...

... and some 15 mm pink and peach open roses.

I added hip rosebuds to bouquets...

... and some leaves.

After attaching bows made of twine and vintage seam binding ribbon...

... and painting slightly all flowers with white acrylic paint, the card was ready.

Thank you for stopping by :)
Have a nice day!
Klaudia
MIXED RED & WHITE MULBERRY PAPER WILD ROSES 1¼" 30mm (Model: QVR-015)
PALE PINK MULBERRY PAPER OPEN ROSES 15mm, 20mm (Model: MKX-005)
PALE PEACH MULBERRY PAPER OPEN ROSES 15mm, 20mm (Model: MKX-018)
IVORY MULBERRY PAPER OPEN ROSES 25mm (Model: MKX-014)
MIXED RED TONE HIP ROSEBUDS (Model: GST-015)
PEACH MULBERRY HIP ROSEBUDS (Model: GST-062)
GREEN MULBERRY PAPER ROSE LEAVES (Model: MKX-441)
GREEN MULBERRY PAPER ROSE LEAVES (Model: MKX-440)
VINTAGE SEAM BINDING RIBBON - CREAM (Model: MKX-476)
MIXED EARTH TONE HYDRANGRA BLOOMS (Model: MKX-690)
Beautiful card and great tutorial - thank you!
ReplyDeleteA very very beautiful card here, and a great tutorial too.
ReplyDeleteGorgeous card, and thank yo for the tutorial!
ReplyDeleteThis is a stunning design love the colors of the flowers
ReplyDeleteHi your tutorial is brilliant, how do you photograph your cards, the lighting is really good???
ReplyDeleteWow, this is beautiful. What a gorgeous creation.
ReplyDeleteVery pretty! Awesome tutorial!
ReplyDeleteVery very pretty!!!! Thank you for this gorgeous tutorial!!
ReplyDeleteHugs, Barbara GR