Hi everyone!
Some time ago during one of my courses one girl asked me if I can make a tutorial of this rocking chair. It took me such a long time - I am so sorry - but here it is. Maybe not the step-by-step tutorial, but template and explanation is following. Hope you all will enjoy it too!

But first, flowers used form WOC:
- Roses 25mm
- Roses 15mm
- Roses 10mm
- Tea rosebuds
- Rosebuds 4mm


And now let's see how its made:

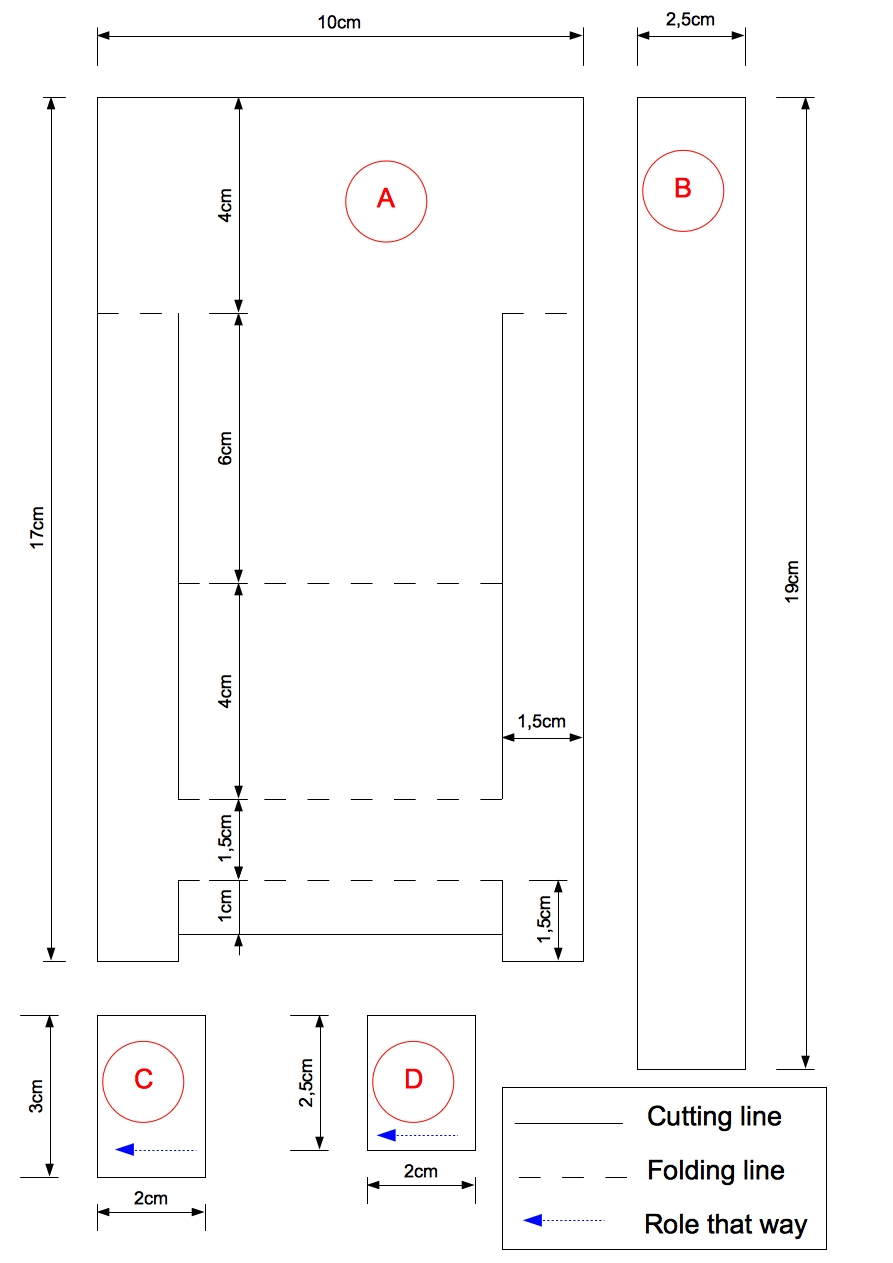
1. Look at a template and cut out a piece A (body of a chair) from the chart. Dashed line shows were you need to bend/fold a paper, and straight line shows were to cut. Use your edge punch to create nice looking edges. Then bend/fold paper looking at a picture of rocking chair, so you know which way to do it.
2. Prepare rocking parts of chair legs by cutting out 2 pieces of B detail. Use the edge punch for decoration from both sides of paper. Bend it like it shown on a photo.
3. Prepare legs of a chair. There are two pairs of legs - front (detail D) and back legs (detail C) - holding the rocking part of it. The back legs are a little bit longer than the front legs! Cut paper as it shown and role/fold it very tight into a cylinder shape, glue the edge.
4. Assemble the chair - glue legs to the chair and the rocking part to the legs of a chair. Decorate as you wish.
Few tips:
- Use thick paper or cardboard paper for chair. Thin paper will not hold the shape of a chair.
- Use hot glue gun or a strong glue for it for strong and stable hold.
- Use text detail (look and a photo were the title is written on a chair 'Til Lykke') as supporting detail to hold a chair together - glue bottom part of a paper to the sitting part and top part to the lean part.

Visit my blog for more inspiration and surprises!
Hugs,
Have a wonderful and creative day!
That is gorgeous! Most impressive work. Thank you for taking the time to make the tutorial.
ReplyDeleteWhat a stunning creation. xxxx
ReplyDeleteWOW!! Gorgeus creation! Thank you so much for the tutorial.
ReplyDeleteBerit x
OMG, WOW!!! THIS IS TOTALLY GORGEOUS!!!! The vintage colors are beautiful. What a super idea. Thanks for the tutorial.
ReplyDeleteWow! This is gorgeous!!!! Thank you so much for this wonderful tutorial =)
ReplyDeleteWowww, this is absolutely amazing, love it !!
ReplyDeletehugs Astrid
That is awesome and you made it just beautiful love it hugs Terrie
ReplyDeleteThis is absolutely beautiful! Thanks for making this tut, so easy to follow.
ReplyDeleteHugs Yolanda