Saturday, 9 June 2012

Land of the Free!

Hello Everyone!

I have a Patriotic card to share with you. I just love the way this card came out.

New Products!!!
I just got my DT package from Wild Orchid Crafts last week and oh my! There's these new colors in the HIP Rosebuds, they are truly gorgeous! There's also some new wooden buttons and flat back pearl strips. Wild Orchid is constantly updating the New Products section.

Have a lovely weekend!

Hugs, Mindy


Supplies
Paper - Bo Bunny, Copic Xpress, SU
Ink - Memento and Copics
Accessories - SU hardware

Friday, 8 June 2012

A pink card :)

  Good morning everyone ♥ I like to show a round card from me today :) This is made for a confirmand. I've used papers from Pion Design and stamp from Kort og Godt. I have used many different dies on this card: cardbase is made with Spellbinders Grand, some regular sized dies from Spellbinders, butterfly and swirl from Magnolia, doily from Marianne Design and envelope from QuicKutz. Lovely flowers and pearls from Wild Orchid Craft: Self Adhesive Pearls, Carnations and Trellis Roses.


  Hugs, elsi ♥


Thursday, 7 June 2012

Recycle...


Hi everybody....today I have a tutorial to show you. 
I just love to recycle...
Something new = something looking old...

Beautiful flowers from Wild Orchid Crafts - Open Roses 10mm, 20mm.
In the box I have put some beautiful cotton lace from Wild Orchid Crafts - Cotton Lace

1. Glue some paper to the box with MultiMedium Matte.
Let it dry.


2. Spray some water on the paper and pull it gentle of.
 

3. Glue some old book paper on the box with MultiMedium Matte.
Let it dry.

4. Distress the box with Adirondack Alcohol Ink - Mixatives Copper, Ginger and Snow Cap.


Glue some old book paper inside the box. 


Distress the flowers with Distress Ink pad - Walnut Stain. 

Thanks for stopping by :o))
Anne Kristine

Wednesday, 6 June 2012

Country Style

After this dull and wet weekend I think a bit of summer brightness is in order.  Yellow and red are such happy colours and work so well together.

bev-rochester-sugar-nellie-country-style

I have used embellishments from Wild Orchid CraftsTrellis Rose, 25mm wild rose, 20mm roses, 15mm roses, 6mm rose buds.  And I finished it off with a gorgeous gingham ribbon bow.

bev-rochester-sugar-nellie-country-style3


bev-Butterfly-1-Signature-BRa_thumb[1]

Monday, 4 June 2012

Bright and cheery

Hi everyone, its Kylie here today to share a bright cheery card with you. 


I hope you've had a lovely weekend. 
Until next time,
Hugs, Kylie x

Sunday, 3 June 2012

Rocking Chair with Tutorial


Hi everyone!

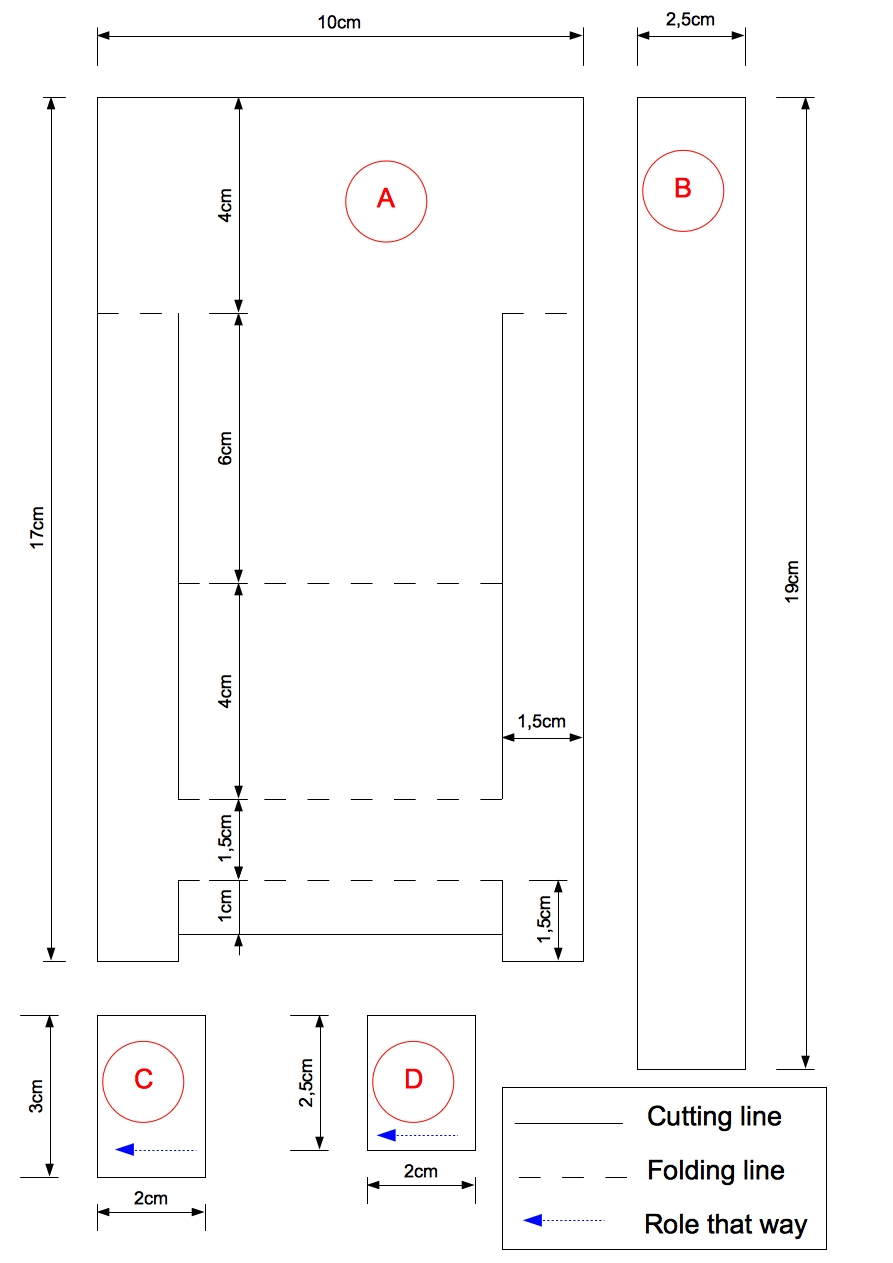
Some time ago during one of my courses one girl asked me if I can make a tutorial of this rocking chair. It took me such a long time - I am so sorry - but here it is. Maybe not the step-by-step tutorial, but template and explanation is following. Hope you all will enjoy it too!


But first, flowers used form WOC:
- Roses 25mm
- Roses 15mm
- Roses 10mm
- Tea rosebuds 
- Rosebuds 4mm


And now let's see how its made:


1. Look at a template and cut out a piece A (body of a chair) from the chart. Dashed line shows were you need to bend/fold a paper, and straight line shows were to cut. Use your edge punch to create nice looking edges. Then bend/fold paper looking at a picture of rocking chair, so you know which way to do it. 

2. Prepare rocking parts of chair legs by cutting out 2 pieces of B detail. Use the edge punch for decoration from both sides of paper. Bend it like it shown on a photo.

3. Prepare legs of a chair. There are two pairs of legs - front (detail D) and back legs (detail C) - holding the rocking part of it. The back legs are a little bit longer than the front legs! Cut paper as it shown and role/fold it very tight into a cylinder shape, glue the edge. 

4. Assemble the chair - glue legs to the chair and the rocking part to the legs of a chair. Decorate as you wish.

Few tips:
- Use thick paper or cardboard paper for chair. Thin paper will not hold the shape of a chair.
- Use hot glue gun or a strong glue for it for strong and stable hold.
- Use text detail (look and a photo were the title is written on a chair 'Til Lykke') as supporting detail to hold a chair together - glue bottom part of a paper to the sitting part and top part to the lean part. 
Visit my blog for more inspiration and surprises! 

Hugs,

Have a wonderful and creative day!

Saturday, 2 June 2012

You're Marvelous

Happy Saturday!
Hope you had a great week, so far :)

Today I'm gonna show you a card I've made, using a (for me ) unusual (?) colorcombo; teal & peach!!
Not colours I've used together before (I think), but I loved the result :)
The beautiful image "Fairy Child - Forget Me Not" from Scrapbook Stamp Society/Addicted To Stamps, is coloured with Promarkers and Prismacolors.
I've used georgeous papers from BildmÃ¥larna and Pion design, and of course lots of delightful embellishments from Wild Orchid Crafts!!!